Wednesday 20 June 2018

How to Retrieve Deleted Text Messages from iPhone X/8/7/6s/6/5s/5c/5/4s/4


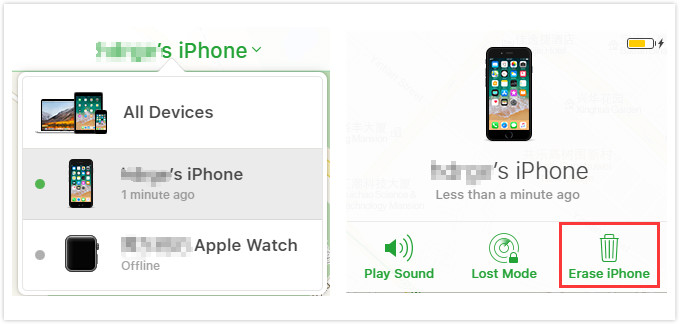
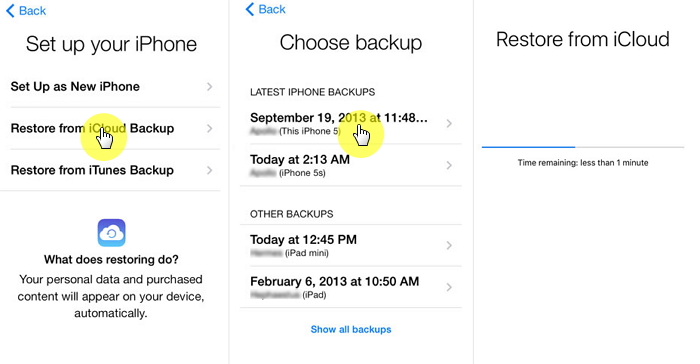
2 Retrieve Deleted iPhone Text Messages from iCloud Backup

If you have turned on iCloud on your device, then it is likely that you could retrieve the messages by restoring the iCloud backup. Here's how to do it.
  1. Go to Settings > General > Reset,choose Erase All Content and Settings.
  2. Follow the instructions on the Setup assistant and then select "Restore from an iCloud Backup".
  3. Choose the iCloud backup including the deleted text messages and wait for the restoration process to complete.
 Restoring iCloud Backup

3 Retrieve iPhone Deleted Text Messages from iTunes Backup

Before you restore an iTunes backup, remember that new data that was not included in the backup will be overwritten. Therefore, backup existing data before restoring the deleted messages. Here's how to restore an iTunes backup.
  1. After you connect your iPhone to the computer on which you perform the backup, iTunes will open, and click the iPhone icon in top left corner of the window.
  2. Click on Restore Backup... to choose the exact iTunes backup. After restoring, you will see the deleted messages back on your iPhone.
 Restoring iTunes Backup
But besides the disadvantage of overwriting the existing data, iTunes cannot read your text messages before restoration, which means you have to restore all the messages and data you don't need. And for people who don't back up their data often, or who delete their text messages after last backup, in this situation you can use Gihosoft iPhone Data Recovery is a professional iPhone Data Recovery software to get back all your lost text message, photo, video, call history, note, contact and more from iPhone/iPad/iPod Touch. It offers a full solution to recover your lost data in different tough situations. Besides recovering data directly from iPhone, iPad and iPod touch, it also allows you to recover data from iCloud and iTunes backup files.


How to Unlock iPhone Passcode with/without Computer 2018


Unlock iPhone Passcode with Computer Using iCloud

Removing iPhone passcode from iPhone can be done through Find My iPhone” but you must have enabled this feature on your iPhone before now. To unlock a locked or disabled iPhone via Find My iPhone:
  1. Go to https://www.iCloud.com on another device or PC and log in your Apple ID and password.
  2. Click “Find My iPhone > All Devices”.
  3. Choose the device you want to erase the passcode from and click “Erase iPhone”. After this, all your settings and passcode will be erased.
  4. erase-iphone-from-icloud

3Unlock iPhone Passcode without Computer Using Siri Bug

You may not believe this, but there is a loophole in Siri that can help you to open a locked iPhone. This solution has been confirmed to work for many iPhone users, while other have waved it off, but there is no harm in trying it.
  1. If you’ve activated Siri on your device, then you can commence by pressing the Home button.
  2. Say “Hey Siri, what time is it?” This would make Siri display the present time with a clock icon adjoining to it.
  3. Tap on the clock icon. You’ll be redirected to the World clock page, tap “+” icon to add another clock.
  4. Now, the interface will provide a search bar from where you can search for a city. Write anything to provide textual entry.
  5. Tap on the text to see options, and then click "Select All”.
  6. Click “Share” and various options to share text will appear. Click the “Message” icon and a new interface will open where you can draft your message.
  7. get-into-locked-iphone
  8. On the “To” field, type any text and hit the return key on your keyboard for the text to go green.
  9. Click “+” once again to launch a new interface. Click “Create New Contact > Add Photos > Choose Photo”. Then select the photo from your library by browsing the album of your choice.
  10. Wait a second, and then tap your Home button. You will be on iPhone home page. You can now access your iPhone as before.
  11. get-into-a-locked-iphone
Gihosoft iPhone Data Recovery is a professional iPhone Data Recovery software to get back all your lost text message, photo, video, call history, note, contact and more from iPhone/iPad/iPod Touch. It offers a full solution to recover your lost data in different tough situations. Besides recovering data directly from iPhone, iPad and iPod touch, it also allows you to recover data from iCloud and iTunes backup files.

Sunday 17 June 2018

Free Music Downloads Online for iPod Touch

Free Music Downloads Online for iPod Touch
1 FMA


The Free Music Archive (FMA) is a wonderful place to find music at no cost. WFMU based out of New Jersey runs the FMA website and it was designed with the intentions of making music from every genre available to the public. It has been around since 2009 and providing users with great music.
2 NoiseTrade


NoiseTrade is another website that allows you to download free music. Artists of all size have music available on the website. The catch is, to download music you have to provide your email and zip code to give the artists promotional contacts. A smooth interface is easy for users of all experience levels.
3 SoundCloud


One of the most well-known websites for downloading free music is SoundCloud. SoundCloud has free music from artists of all levels. From new to professional. Just be aware that not every song on SoundCloud is free.Gihosoft iPhone Data Recovery is a professional iPhone Data Recovery software to get back all your lost text message, photo, video, call history, note, contact and more from iPhone/iPad/iPod Touch. It offers a full solution to recover your lost data in different tough situations. Besides recovering data directly from iPhone, iPad and iPod touch, it also allows you to recover data from iCloud and iTunes backup files.


The Best and Recommended Fix for iTunes Error 310

Apple Recommended Solution - Set the Internet Explorer (Complicated)

When connecting to iTunes store and you may notice the iTunes error 310. Due to this, you must check if other browsers such as Mozilla and Google work perfectly. If they function properly, but the iTunes don't connect, there may be a problem with the internet explorer connection.
Step 1: Launch and open the internet explorer, and you may receive a message "Proxy Server is not responding." When this occurs, click on the "Tools" in the browser toolbar and select "Internet options."Gihosoft iPhone Data Recovery is a professional iPhone Data Recovery software to get back all your lost text message, photo, video, call history, note, contact and more from iPhone/iPad/iPod Touch. It offers a full solution to recover your lost data in different tough situations. Besides recovering data directly from iPhone, iPad and iPod touch, it also allows you to recover data from iCloud and iTunes backup files.

Step 2: When the "Internet Options" window is displayed, click on the connections tab at the top and select the Local Area Network settings.
Step 3: Click "OK" to close the Local Area Network settings window. Close the "Internet Options" window.
Step 4: Re-open the internet explorer, it should be working perfectly.
Set the Internet Explorer

3. Other Fix Tips

Switch off Parental Control

This method usually works perfectly for iTunes users experiencing error 310.
Step 1: Open iTunes in the dialog box
Step 2: In the dialog box, click on the parental tab
Step 3: Disable access to the iTunes store by inspecting the box tagged as iTunes store
Step 4: Select the grey color that allows access to iTunes automatically.
Step 5: Select OK, exit and open the iTunes again.
Switch off Parental Control

2. Perform a Full Malware Scan on Your Computer

There is a probability that the 310 error could be linked to a malware infection on your computer. This malicious infection can corrupt, and damage runtime errors-related files. Also, there is a chance that the 310 error you are experiencing is associated with a component of the malicious program.
Full Malware Scan

3. Clean out Your System Junk (Temporary Folders and Files) with Disk Cleanup

Over time, your PC accumulates junk files from computer use and web surfing. If this junk is not cleaned out occasionally, it can lead to slow respond of iTunes or cause 310 errors due to overloaded hard drive or file conflicts. However, cleaning these temporary files with Disk Cleanup may not only resolve the 310 error, but it can speed up the performance of your computer.
How to Run Disk Cleanup on PC:
Step 1: Click on the start button
Step 2: Search for the word “command,” don’t click on the “ENTER” button yet
Step 3: Hold the Ctrl-Shift button on your keyboard and press “ENTER.”
Run Disk Cleanup
Step 4: An authorization dialog box will be displayed, click “Yes.”
Step 5: A black box with a blinking cursor will display. Type “cleanmgr” and press “OK.”
Step 6: The disk cleanup will start to analyze the occupied disk space you can recover.
Step 7: Check the boxes of the categories you want to clean and press OK.

How to Add Songs to iCloud Music Library


Part 1: How to Add Songs to iCloud Music Library

On iPhone/iPad

iPhone/iPad users can easily add songs to iCloud music library by taking the following steps.
  1. First, go to the Music app and choose the song to be added.
  2. Click on the 3 dots button in the front of the music.
  3. Then, click on Add to My Music.

On PC/Mac

The selected music will now be added to iCloud music library and will be available for instant play. However, if you intend to add songs to iCloud music library using your PC/Mac, follow the steps below.
  1. First, go to iTunes and choose the song to be added.
  2. Click on the 3 dots button in the front of the music.
  3. Then, click on Add to My Music.

Part 2: How to Save iCloud Music for Offline Play

Using any of Apple’s devices, you can add any song you want to iCloud music library. But, what if you want to play your music offline, is that possible? Yes! Just follow the next steps to save your music and play it anytime offline.

On iPhone/iPad

  1. Open Music app on your iPhone
  2. Choose a song you prefer.
  3. Tap 3 dots at the right side.
  4. Click Make Available Offline.
  5. You are done and can play offline from that moment.

On Mac

  1. Go to iTunes on your device.
  2. Click on My Music tab.
  3. Tap on the view type drop down and choose the Show Columns.Gihosoft iPhone Data Recovery is a professional iPhone Data Recovery software to get back all your lost text message, photo, video, call history, note, contact and more from iPhone/iPad/iPod Touch. It offers a full solution to recover your lost data in different tough situations. Besides recovering data directly from iPhone, iPad and iPod touch, it also allows you to recover data from iCloud and iTunes backup files.

  4. Tap the iCloud Download option.
  5. Locate the cloud icon with a downward arrow and click to start downloading the track.
  6. You are done and can play offline from that moment.

Note: Restrictions to add songs to iCloud music library

When trying to add music to iCloud music library from your iPhone or Mac, there could be some restriction issues. You should know that before adding songs, check to see if they are encoded in the formats of WAV, ALAC, or AIFF. All of these are usually transcoded to a separate temporary AAC 256 Kbps file locally, but the original files will remain unchanged.
When uploading, ensure that your iTunes iCloud Music Library is enabled so that no tracks will be lost between your PC and mobile devices.
You also need enough iCloud Space to save your music to iCloud. When you exceed free 5GB storage, you'll have to pay for more iCloud storage plan.

How to Sync Calendar from Mac to iPhone

How to Sync Calendar from Mac to iPhone

Tip 1. Sync Mac calendar with iPhone via iCloud


You can now make use of iCloud to establish this task within short period. iCloud is an amazing online platform to sync most data type on your iPhone. Let us have a quick synopsis about the stepwise procedure to synchronize Mac calendar with the iPhone through iCloud platform.


Step 1: Launch your Mac and navigate to ‘System preference’ option.


Step 2: Continue and click on ‘iCloud control panel’.


Step 3: Enter into your Apple account by typing your credentials in the respective fields.


Step 4: Check for ‘Calendars’.


Step 5: Unlock your iPhone and click on the ‘Settings’ option.


Step 6: Select ‘Your iCloud Account’ from the displayed list.


Step 7: Choose ‘iCloud’ and turn on the Calendars from the expanded items.


Step 8: The data will be automatically get synchronized by completing this procedure.


Follow the steps above to sync calendar with your iPhone through the iCloud platform. The steps are very simple and you can follow up without any difficulty.
Tip 2. Sync calendar from Mac to iPhone via iTunes


For an alternative of iCloud, iTunes also enables to sync iphone calendar with mac. Check it out the tips below for successful results.Gihosoft iPhone Data Recovery is a professional iPhone Data Recovery software to get back all your lost text message, photo, video, call history, note, contact and more from iPhone/iPad/iPod Touch. It offers a full solution to recover your lost data in different tough situations. Besides recovering data directly from iPhone, iPad and iPod touch, it also allows you to recover data from iCloud and iTunes backup files.


Step 1: Launch the latest version of iTunes on your computer and connect your iPhone to your PC through the data cable.


Step 2: Press the ‘iPhone device’ button available in the iTunes platform and continue to tap ‘info’ option in the list.


Step 3: In the right side panel check on the ‘Sync Calendars’ and ‘All Calendars’ option.


Step 4: Press the ‘Apply’ button to trigger the synchronization process.


Step 5: Check your calendar in your iPhone soon after the completion of the above discussed steps.


You can adopt similar steps to synchronize any data from Mac to iPhone through iTunes platform.
Tip 3. Sync Mac outlook calendar with iPhone


It is now possible to sync Mac outlook calendar with your iPhone within few simple steps. Just glance through the steps for better understanding.


Step 1: Select ‘Services’ option from the Tools tab.


Step 2: From the divided screen check the ‘Calendar’ option in the left panel.


Step 3: Choose the account from ‘Select the accounts to sync’.


Step 4: In the Outlook folder respond to the popup menu by adding new item at the respective place.


Step 5: Press the ‘Ok’ button and close the ‘Sync services’ window.


Step 6: The synchronization process duration depends on the size of your calendar.


Step 7: After the completion of synchronization process open your iPhone and check out the synchronized data.


I am sure by surfing through the above steps you can now easily synchronize the calendar using the Outlook service.

2 Solutions on "How to Reset iTunes Password"


2 Solutions on "How to Reset iTunes Password"

Following are some methods to reset iTunes password:

1 How to Reset iTunes Password on iPhone?

There are two ways to do this: reset with password and reset without password.

Reset with Password

If you remember your Apple password, then it will be very easy for you to reset iTunes password. All you need to do is use your iPhone’s Settings app and change the password by following the on-screen instructions. This method will work on iPhones with iOS 10 or later.Gihosoft iPhone Data Recovery is a professional iPhone Data Recovery software to get back all your lost text message, photo, video, call history, note, contact and more from iPhone/iPad/iPod Touch. It offers a full solution to recover your lost data in different tough situations. Besides recovering data directly from iPhone, iPad and iPod touch, it also allows you to recover data from iCloud and iTunes backup files.

Follow these instructions:
Step 1. On your iPhone, open Settings app.
Step 2. Navigate to [your name] > Password & Security and then find and tap Change Password
Step 3. Now follow the on-screen instructions to input your current password and then input new password.
change-apple-id-password-on-iphone

Reset without Password

If you don’t remember your Apple password, then it will be a little more complicated to reset your iTunes password on your iPhone. However, it can be done. All you need to do is visit a specific URL on your iPhone’s web browser and reset your password there.
Follow these instructions:
Step 1. Open Safari, Chrome, Firefox or any other web browser on your iPhone.
Step 2. Visit this directory: appleid.apple.com
Step 3. Tap on the Sign in option and enter your Apple ID. Tap next and then click the Forgot Apple ID option.
find-back-apple-id-password
Step 4. Now there are two ways you can reset your password. You can either use another device or use a trusted phone number to reset the password.
Step 5. If you want to reset via another device, then choose the corresponding option. The other device you choose will receive email message with instructions to reset the password.
Step 6. If you want to reset your password via a trusted number, then select the corresponding option and input your phone number. You will be able to reset the password by following the on-screen instructions afterwards.
use-trusted-phone-number-to-reset-appleid-password

2 How to Reset iTunes Password on Computer?

Just like resetting iTunes password on iPhone, there are two ways to reset iTunes password on computer.

Reset with Password on Mac

You will need to perform a few simple steps when resetting with password on your Mac. The process is quite straightforward.
Follow these instructions:
  • Open System Preferences on your Mac and navigate to iCloud > Account Details > Security.
  • Now find and select the Change Password option.
  • Input your current password and then follow the on-screen instructions to set a new one.
itunes-password-reset-mac

Reset without Password on PC/Mac

This process is similar to resetting iTunes password on iPhone. You can either use your Windows PC or Mac to do this.

Fixes for “There was An Error Connecting to the Apple ID Server” 2019

Fixes for “There was An Error Connecting to the Apple ID Server” 2019 1. Check If Apple’s Servers are Down The first thing you ought to...