Apple Recommended Solution - Set the Internet Explorer (Complicated)
When connecting to iTunes store and you may notice the iTunes error 310. Due to this, you must check if other browsers such as Mozilla and Google work perfectly. If they function properly, but the iTunes don't connect, there may be a problem with the internet explorer connection.
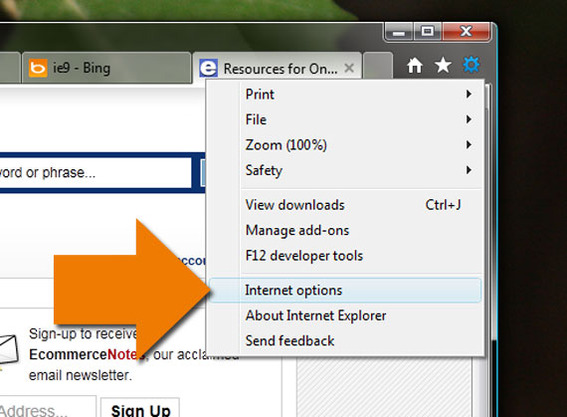
Step 1: Launch and open the internet explorer, and you may receive a message "Proxy Server is not responding." When this occurs, click on the "Tools" in the browser toolbar and select "Internet options."Gihosoft iPhone Data Recovery is a professional iPhone Data Recovery software to get back all your lost text message, photo, video, call history, note, contact and more from iPhone/iPad/iPod Touch. It offers a full solution to recover your lost data in different tough situations. Besides recovering data directly from iPhone, iPad and iPod touch, it also allows you to recover data from iCloud and iTunes backup files.
Step 2: When the "Internet Options" window is displayed, click on the connections tab at the top and select the Local Area Network settings.
Step 3: Click "OK" to close the Local Area Network settings window. Close the "Internet Options" window.
Step 4: Re-open the internet explorer, it should be working perfectly.
3. Other Fix Tips
Switch off Parental Control
This method usually works perfectly for iTunes users experiencing error 310.
Step 1: Open iTunes in the dialog box
Step 2: In the dialog box, click on the parental tab
Step 3: Disable access to the iTunes store by inspecting the box tagged as iTunes store
Step 4: Select the grey color that allows access to iTunes automatically.
Step 5: Select OK, exit and open the iTunes again.

2. Perform a Full Malware Scan on Your Computer
There is a probability that the 310 error could be linked to a malware infection on your computer. This malicious infection can corrupt, and damage runtime errors-related files. Also, there is a chance that the 310 error you are experiencing is associated with a component of the malicious program.

3. Clean out Your System Junk (Temporary Folders and Files) with Disk Cleanup
Over time, your PC accumulates junk files from computer use and web surfing. If this junk is not cleaned out occasionally, it can lead to slow respond of iTunes or cause 310 errors due to overloaded hard drive or file conflicts. However, cleaning these temporary files with Disk Cleanup may not only resolve the 310 error, but it can speed up the performance of your computer.
How to Run Disk Cleanup on PC:
Step 1: Click on the start button
Step 2: Search for the word “command,” don’t click on the “ENTER” button yet
Step 3: Hold the Ctrl-Shift button on your keyboard and press “ENTER.”

Step 4: An authorization dialog box will be displayed, click “Yes.”
Step 5: A black box with a blinking cursor will display. Type “cleanmgr” and press “OK.”
Step 6: The disk cleanup will start to analyze the occupied disk space you can recover.
Step 7: Check the boxes of the categories you want to clean and press OK.


No comments:
Post a Comment